


Event software training
How to manage users in the eventplanner.net event software?
You rarely plan an event alone. A colleague keeps the checklist, your client wants to follow the budget, the stage manager needs the callsheet and the venue has a contact person you call on the day. Contacts is the address book of your event and the place where you decide who may do what in it. Every event has its own contact list, and for every person on it you choose per tool whether they see nothing, may look, or may manage. It is part of the event software of eventplanner.net.
A contact with access becomes a user of your event: they log in with their own eventplanner.net account and work in the same tools as you, limited to what you allowed. A contact without access is simply a record for you and your team, such as the contact person of your venue.
Want to see what Team & access can do for you before you start? Have a look at the overview page first.
Where to find it: log in, choose event software in the main menu and open Team & access in the menu of your event.
1. Before you start
An event
Contacts belong to an event, so the first time you open Contacts you are asked to create one. Click Add your first event, fill in a name, a date and the type of event, and save. Read how to set up an event for the details.
You are already on the list
The moment you create an event, you are added to its contacts as the owner, with Manage access to every tool. Your row is always at the top of the list. Nobody can take that access away or remove you from your own event, not even a colleague who manages the contacts.
Free version and .PRO
In the free version of the event software, an event holds up to 50 contacts, you included. With .PRO, an event holds up to 400. The limit follows the membership of the person who adds the contacts, so the organiser who builds the team needs .PRO for a bigger list, not the people on it.
The contacts you invite do not need .PRO to work on your event: the basic tools are free for everyone, and an event that is shared with them does not count as their own active event. Two tools are the exception. Suppliers and Plan / Seating are .PRO tools, and the membership is checked per person: a contact who opens one of them needs their own .PRO membership, whatever access you gave them.
2. Read your contact list
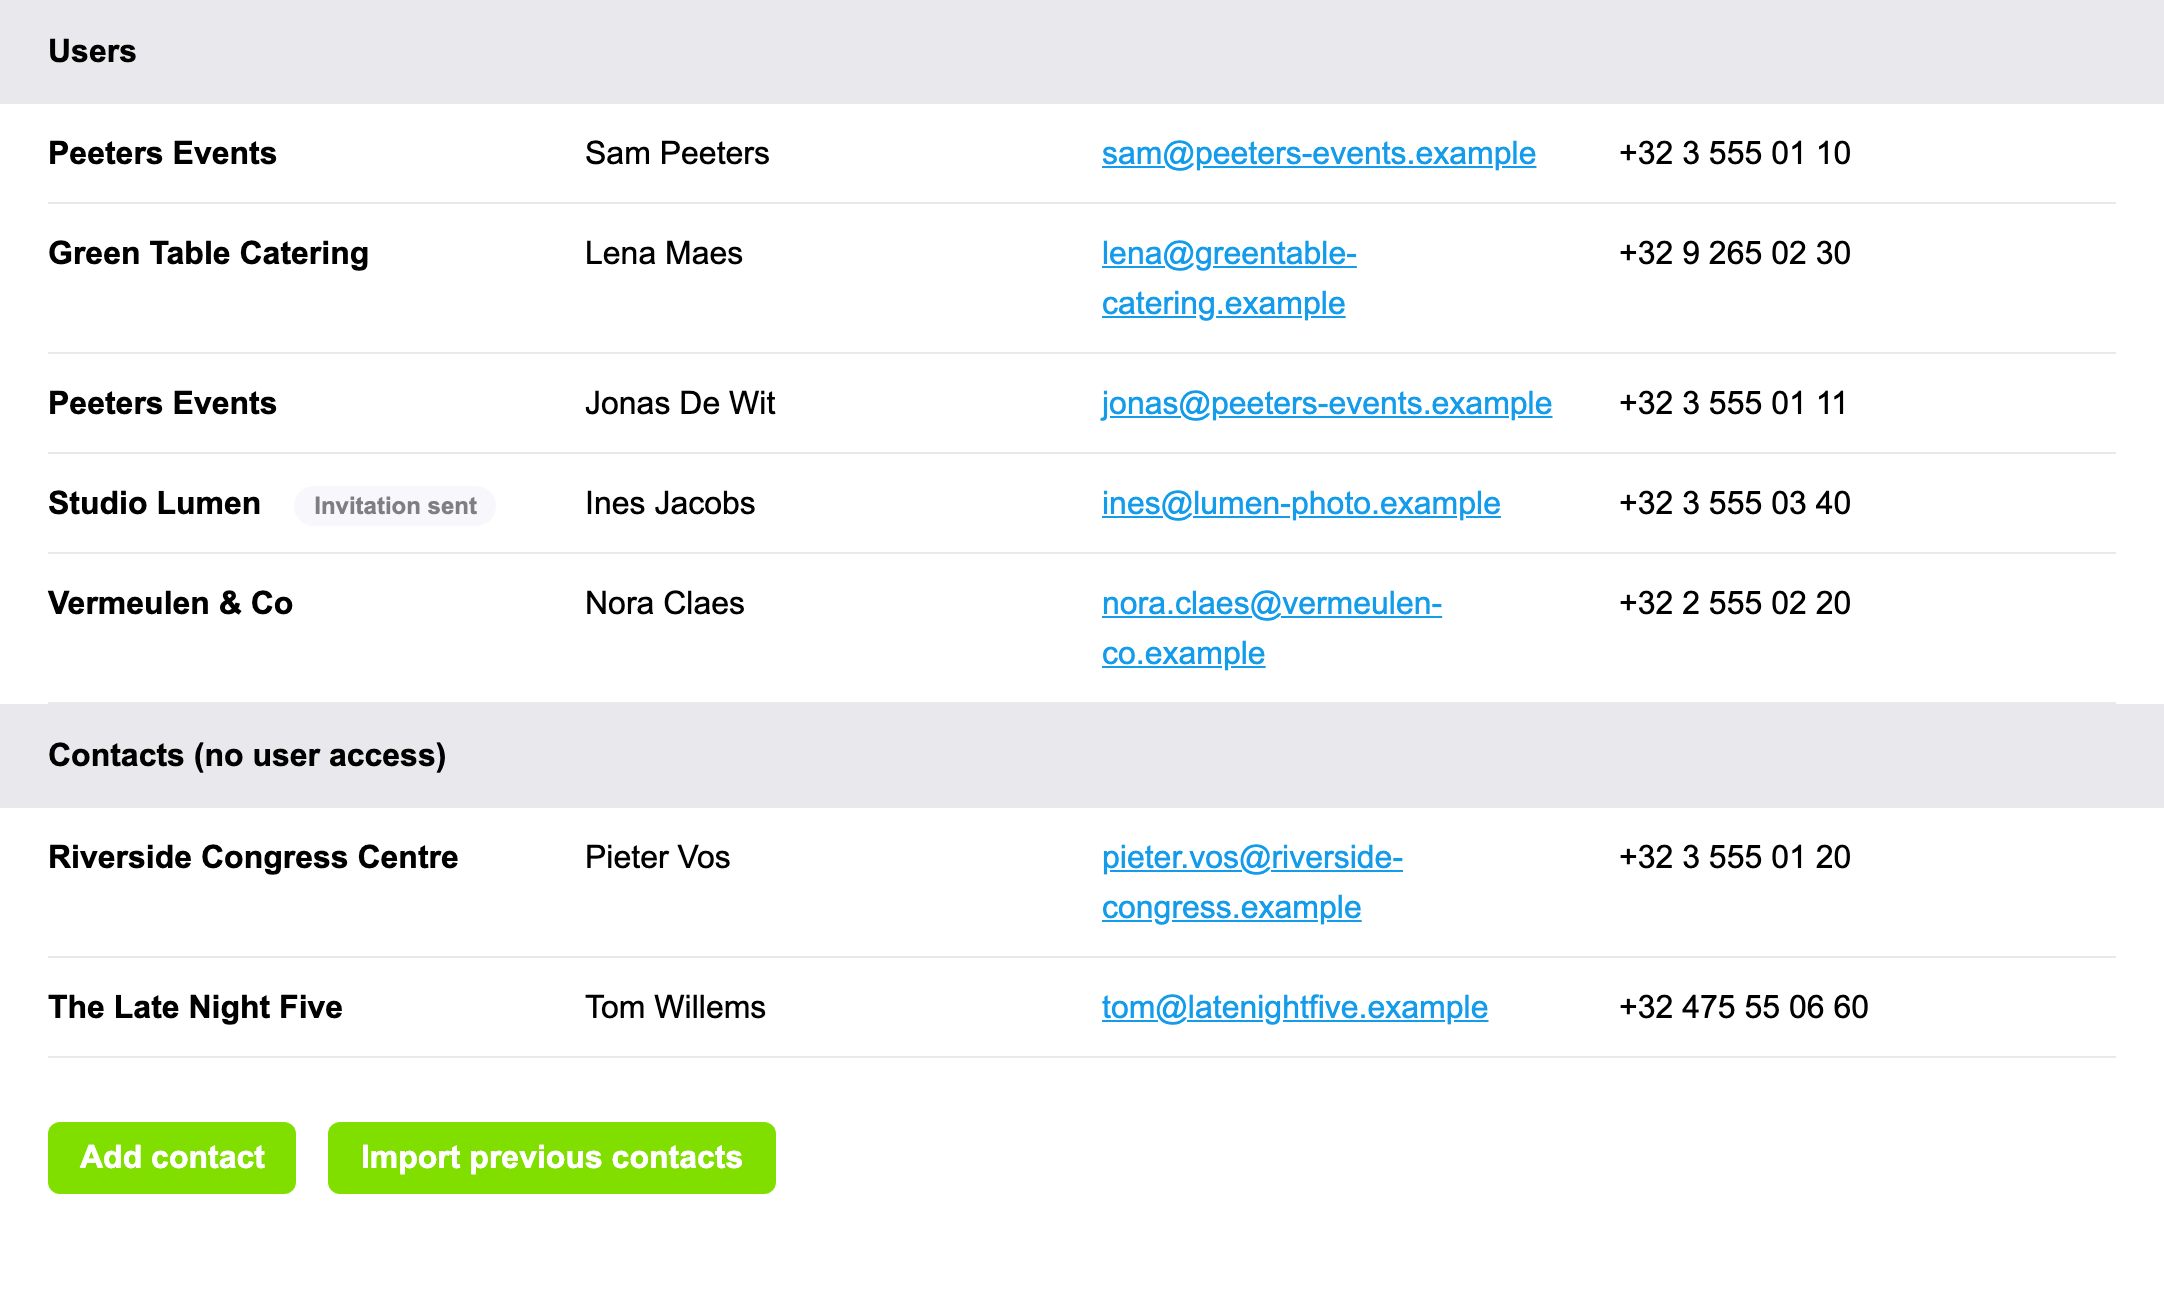
The list shows every contact of your event in two groups:
- Users are the contacts with access to at least one tool. They can log in and work on your event.
- Contacts (no user access) are the people you keep for reference. Nothing is shared with them and they cannot open your event.
Every row shows the company, the name, the e-mail address and the phone number. The e-mail address is a link, so you can write to someone straight from the list. A row with the label Invitation sent is a user who has not accepted your invitation yet (section 5).
Click a row to open it and change the details or the access. Only contacts with Manage access to Contacts can do that: with Read access you see the list, without the buttons.
3. Add a contact
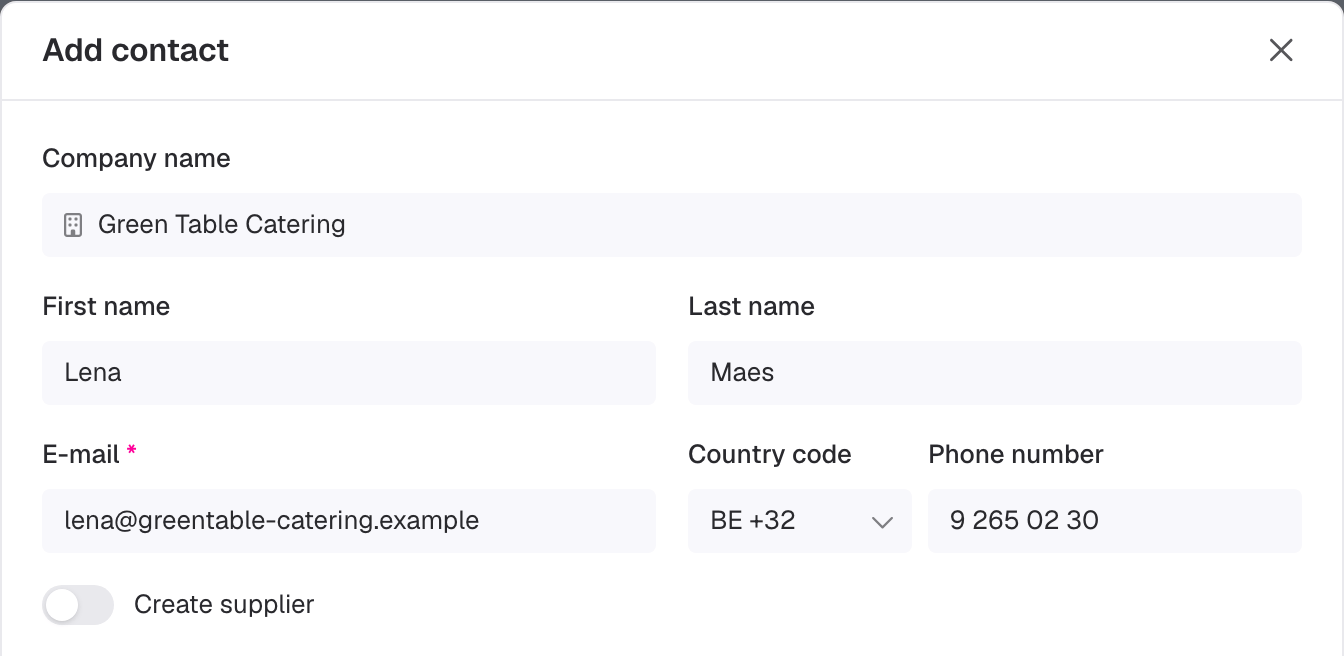
Click Add contact, or Invite in the Team & access tile on the Overview of your event. A window opens with these fields:
| Field | What to fill in |
|---|---|
| Company name | Start typing the name. Businesses with a page on eventplanner.net and the suppliers of your events appear in a list: pick one to link the contact to it (see below). A company that is not in the list is fine too: just type its name. Leave it empty for someone without a company. |
| First name and Last name | The name of the person, as it appears in the list, in the invitation and wherever you assign something to them. |
| Required, and unique within the event: an address can only be on the list once. The invitation goes to this address and the person logs in with it, so use the address of their eventplanner.net account, or the one they will create it with. | |
| Phone number | Pick the Country code and type the number. |
| Create supplier | Switch this on to add the company as a supplier of your event at the same time. Extra fields appear for the Supplier type, the Supplier list and the Enabled checks: read how to use Supplier Management for what they mean. |
| Set contact access | Choose per tool what the person may do (section 4). Leave every tool on No access to add a contact without access. |
Click Add contact at the bottom of the window to save. The window closes, a message confirms that the contact is saved, and the contact appears in the list straight away. A contact with access gets an invitation by e-mail (section 5), a contact without access hears nothing.
Link a contact to a business or a supplier
When you pick a business from the list under Company name, the contact is linked to that business page. Is that business already a supplier of your event? Then the contact is linked to the supplier too, and the window tells you so: This contact will automatically be linked to the existing supplier for this business. The contact then appears under Contacts on the page of the supplier in Suppliers, and receives the briefings you send to that supplier. Pick one of your own suppliers from the list and the contact is linked to it directly.
Contacts without access
Not everyone on your contact list needs to log in. A contact without access is a record for you and your team, and you can still use them everywhere a person is needed:
- assign them a line in Callsheets, so the name and phone number of the stage manager are on the running order,
- send them a briefing: a contact without an account gets a personal link and a password by e-mail when you send it, read how to use Briefings,
- keep them as the contact person of a supplier (see above).
You can give them access at any time: open the contact and set the access per tool. The invitation goes out at that moment.
Tip: adding a contact without access sends nothing to that person. Use it freely for the people you only need to reach, such as the night porter of the venue or the driver of the band.
4. Set contact access
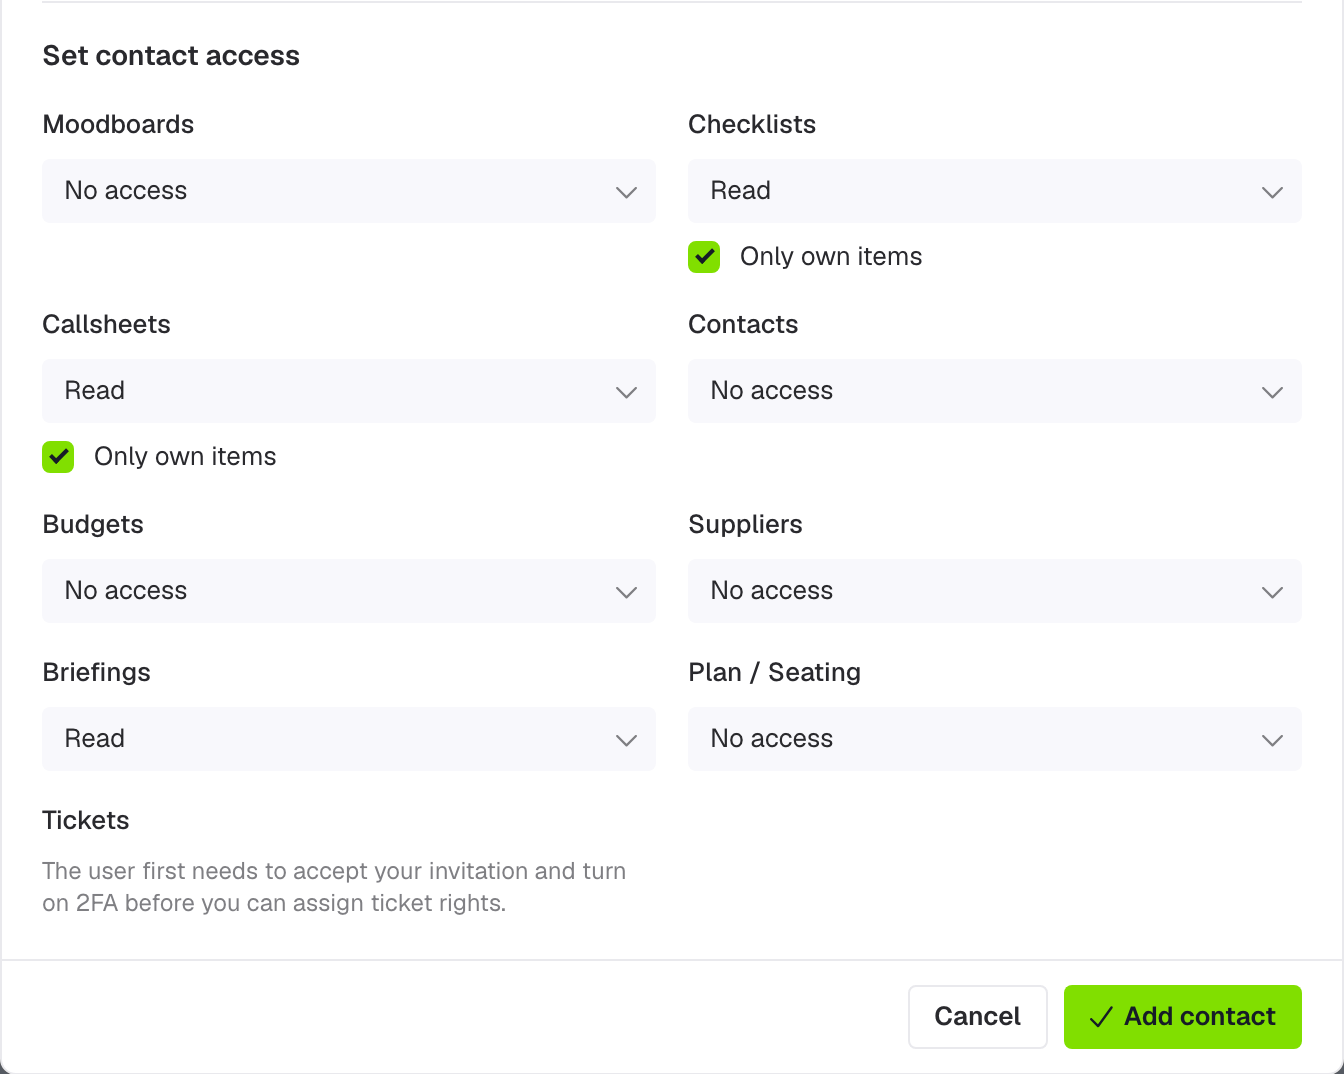
Under Set contact access you choose, tool by tool, what the contact may do. Every tool has its own dropdown, so your client can follow the budget without seeing your supplier contracts, and the photographer can read the callsheet without opening the checklist.
The access levels
| Access | What they can do |
|---|---|
| No access | They do not see the tool for this event. This is the default for every tool of a new contact. |
| Read | They open the tool and see everything in it, but cannot add, change or delete anything. |
| Comment (Checklists only) | Like Read, and they can write comments on tasks. |
| Write (Tickets only) | Like Read, and they can add and edit guests and download the guest list. |
| Manage | They can do everything you can do in the tool: add, change and delete. |
What that means per tool:
| Tool | Read | Manage |
|---|---|---|
| Moodboards | See the moodboard and open its pins. | Pin and remove ideas. |
| Checklists | See the tasks on the board. | Add, edit, move and delete tasks. |
| Callsheets | See the callsheet. | Add, edit and delete lines and sections. |
| Budgets | See the budget, including prices and margins. | Add and edit budget lines and versions. |
| Suppliers (.PRO) | See the supplier list and the pages of the suppliers. | Add suppliers, follow up their checks and link contacts. |
| Briefings | Download the files of a published briefing. | Build, publish and send briefings. |
| Plan / Seating (.PRO) | See the floor plan. | Draw the floor plan and the seating. |
| Tickets | See the guest list and scan tickets. | Change the settings and refund tickets. |
| Contacts | See the contact list, with everyone's e-mail address and phone number. | Add, edit and remove contacts and set everyone's access. |
| Marketing (.PRO) | See the e-mails to your guests and their results. | Write, schedule and send e-mails to your guests. |
Read the help page of each tool for the details: Moodboards, Checklists, Budgets, Suppliers, Briefings and Tickets.
Good to know: Marketing works when the owner of the event has .PRO: your contacts do not need it themselves. Whoever sends or schedules an e-mail needs 2-factor authentication on their own account (section 4), and seeing who receives an e-mail also needs Read access to Tickets, because the recipients are your guests.
Only own items
Under Checklists and Callsheets you can tick Only own items. The contact then only sees the tasks or callsheet lines that are assigned to them, whatever their access level: with Read they see their own tasks, with Manage they can also add tasks, but only for themselves. This is useful for a freelancer or a supplier who helps with one part of the event, or when some tasks hold information that not everyone on the team should see. The checkbox appears as soon as you give access to the tool.
Tickets need 2-factor authentication
The Tickets dropdown is only there once the contact has accepted your invitation and switched on 2-factor authentication (2FA) on their own account. Until then you read The user first needs to accept your invitation and turn on 2FA before you can assign ticket rights. in its place.
2FA means that logging in needs a code from the person's phone next to their password. Tickets hold the personal data of your guests, so we ask this extra protection from everyone who can see the guest list, also when they only scan tickets at the door. Your contact switches it on themselves: logged in, they open their account page and click Enable 2-factor authentication. After that, open the contact again and the dropdown is there.
Who sees the contact list
Give access to Contacts with care: the list holds the names, e-mail addresses and phone numbers of everyone involved in your event, the most personal data an event has. A contact without access to Contacts still sees the names of the team where they assign a task or a callsheet line, but not the e-mail addresses and phone numbers, and when they add watchers to a task they can only add themselves. Manage access to Contacts also means changing everyone's access, except yours as the owner: give it only to the people who build the team with you.
Good to know: the row of the owner is fixed. Even with Manage access to Contacts, the e-mail address and the access of the owner cannot be changed. Only their name and phone number can be corrected.
5. The invitation
The moment you save a contact with access to at least one tool, an invitation goes to their e-mail address. The subject is Invitation to collaborate on event followed by the name of your event. The e-mail is sent in your name as the organiser, not in ours: the sender is your organiser name, or your company name when you have not set one up for your events, and your logo and contact e-mail appear at the bottom when you have. It names you as the person who invites them, lists the tools you gave them access to, and a reply comes straight to you. A button Accept invitation takes them to your event.
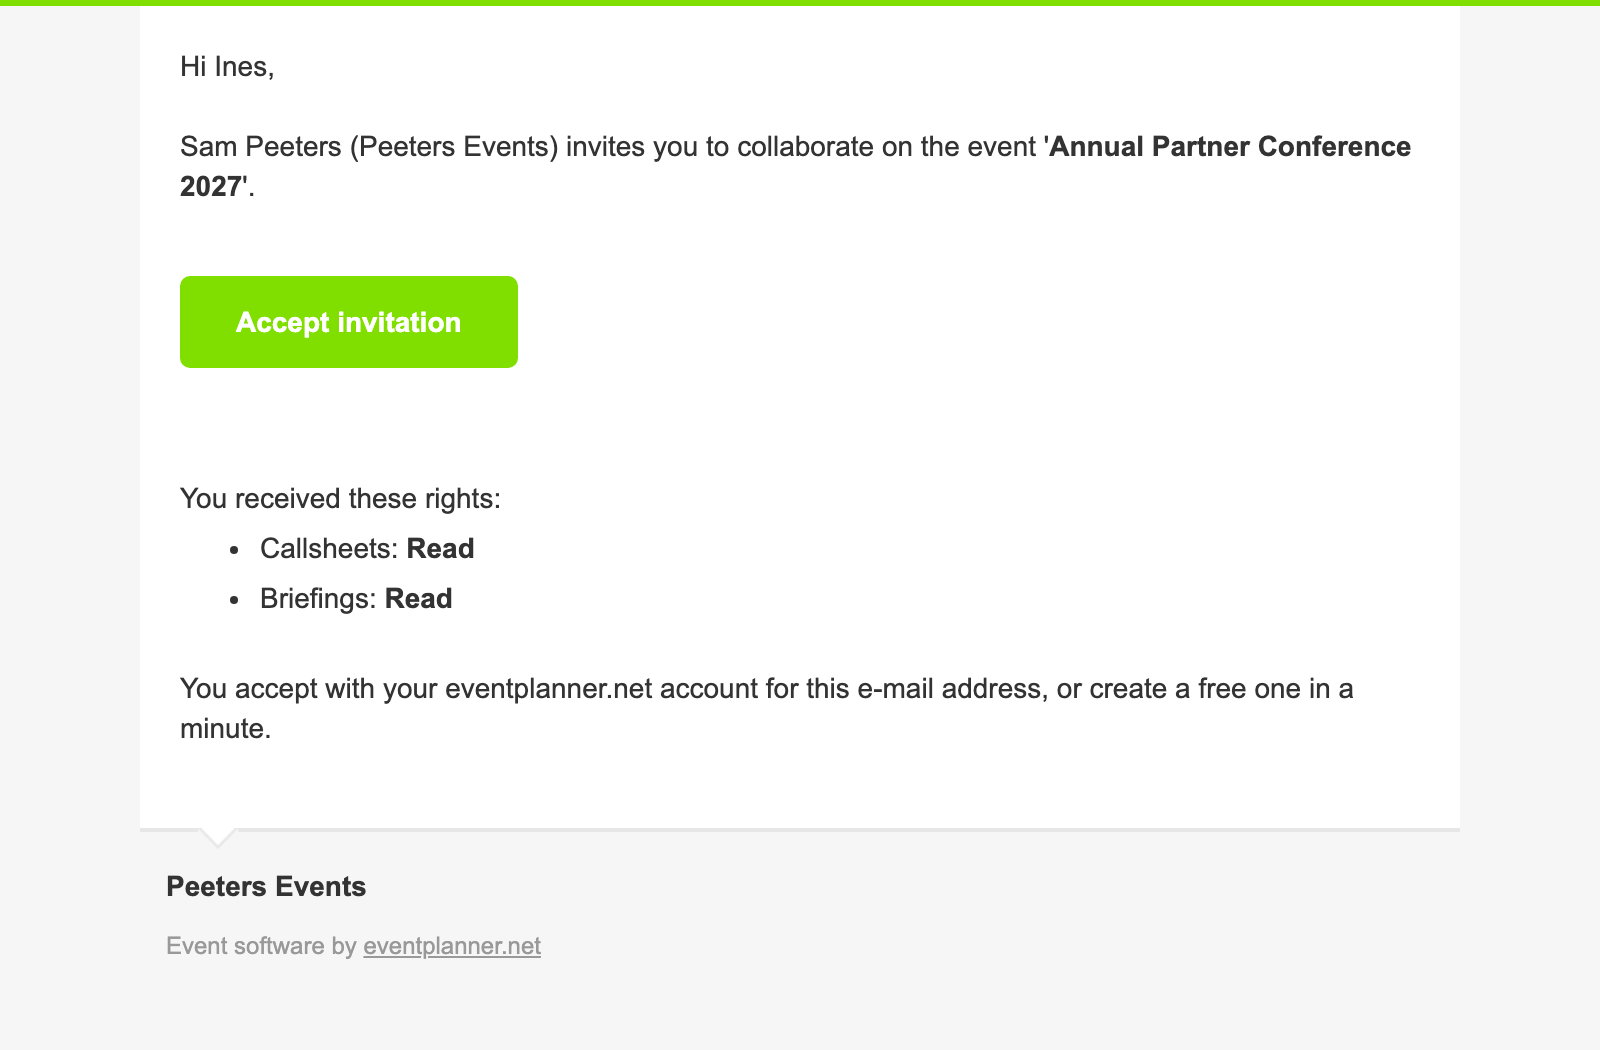
What happens when they click the button depends on whether the address already has an eventplanner.net account:
- They have an account with that address: they log in and land in the event software. Your event is in the list of events at the top of every tool, next to their own events.
- They have no account yet: they create a free one. The registration form is already filled in with their name, company and e-mail address, so it takes a minute. Once registered they are on your event, and the first time they open the event software they land on it.
The invitation is tied to the e-mail address you entered. Someone who logs in with another address, or creates an account with another address, does not get access: the link only works for the account with the invited address.
Follow up an invitation
In the list, a user who has not accepted yet carries the label Invitation sent. Open the contact: right after sending, the bottom of the window says Invite pending ..., and from 30 minutes after the last invitation the button Resend invite takes its place. Click it to send the e-mail again, for example when it ended up in a spam folder. The label disappears as soon as the person accepts. You do not get an e-mail when they do: a look at the list tells you.
When earlier e-mails to an address bounced, or the address is blocked, no invitation is sent at all: the row carries the label Not deliverable instead of Invitation sent, and the contact window tells you why. Correct the e-mail address and save the contact: the invitation then goes out.
The invitation link works once. After it has been used, it opens the page Invalid invitation link. A contact who already accepted does not need it anymore: they open the event from their own event list.
Tip: did the invitation not arrive? Ask your contact to check the spam folder first, and check that you typed the e-mail address correctly. Correct it in the contact, save, and send the invitation again.
Changes after the invitation
A contact who has accepted sees every change of their access the next time they open the tool, without a new e-mail. Giving access to a contact who had none sends the invitation at that moment. Taking all access away again keeps the person on the list under Contacts (no user access): they can no longer open your event.
6. Edit or remove a contact
Click a row in the list to open Edit contact. You can change every detail and every access, then click Save contact.

- Linked supplier shows the supplier of your event this person belongs to. Not linked yet? Pick a supplier from the list to link them, or click Create a supplier when your event has no suppliers yet. A linked supplier shows as a link to its page.
- Delete removes the contact from this event. You are asked to confirm. The person loses access immediately, without an e-mail, and keeps their own account and their place on your other events.
The Delete button only appears when nothing is assigned to the person anymore: no tasks in Checklists, no lines in Callsheets and no tasks they are watching. Reassign those to someone else first, or remove them, and the button appears.
Locks: the owner of the event cannot be removed, and neither their e-mail address nor their access can be changed.
7. Import contacts from an earlier event
Do you work with the same team on every event? Click Import previous contacts to bring them over instead of inviting everyone again.
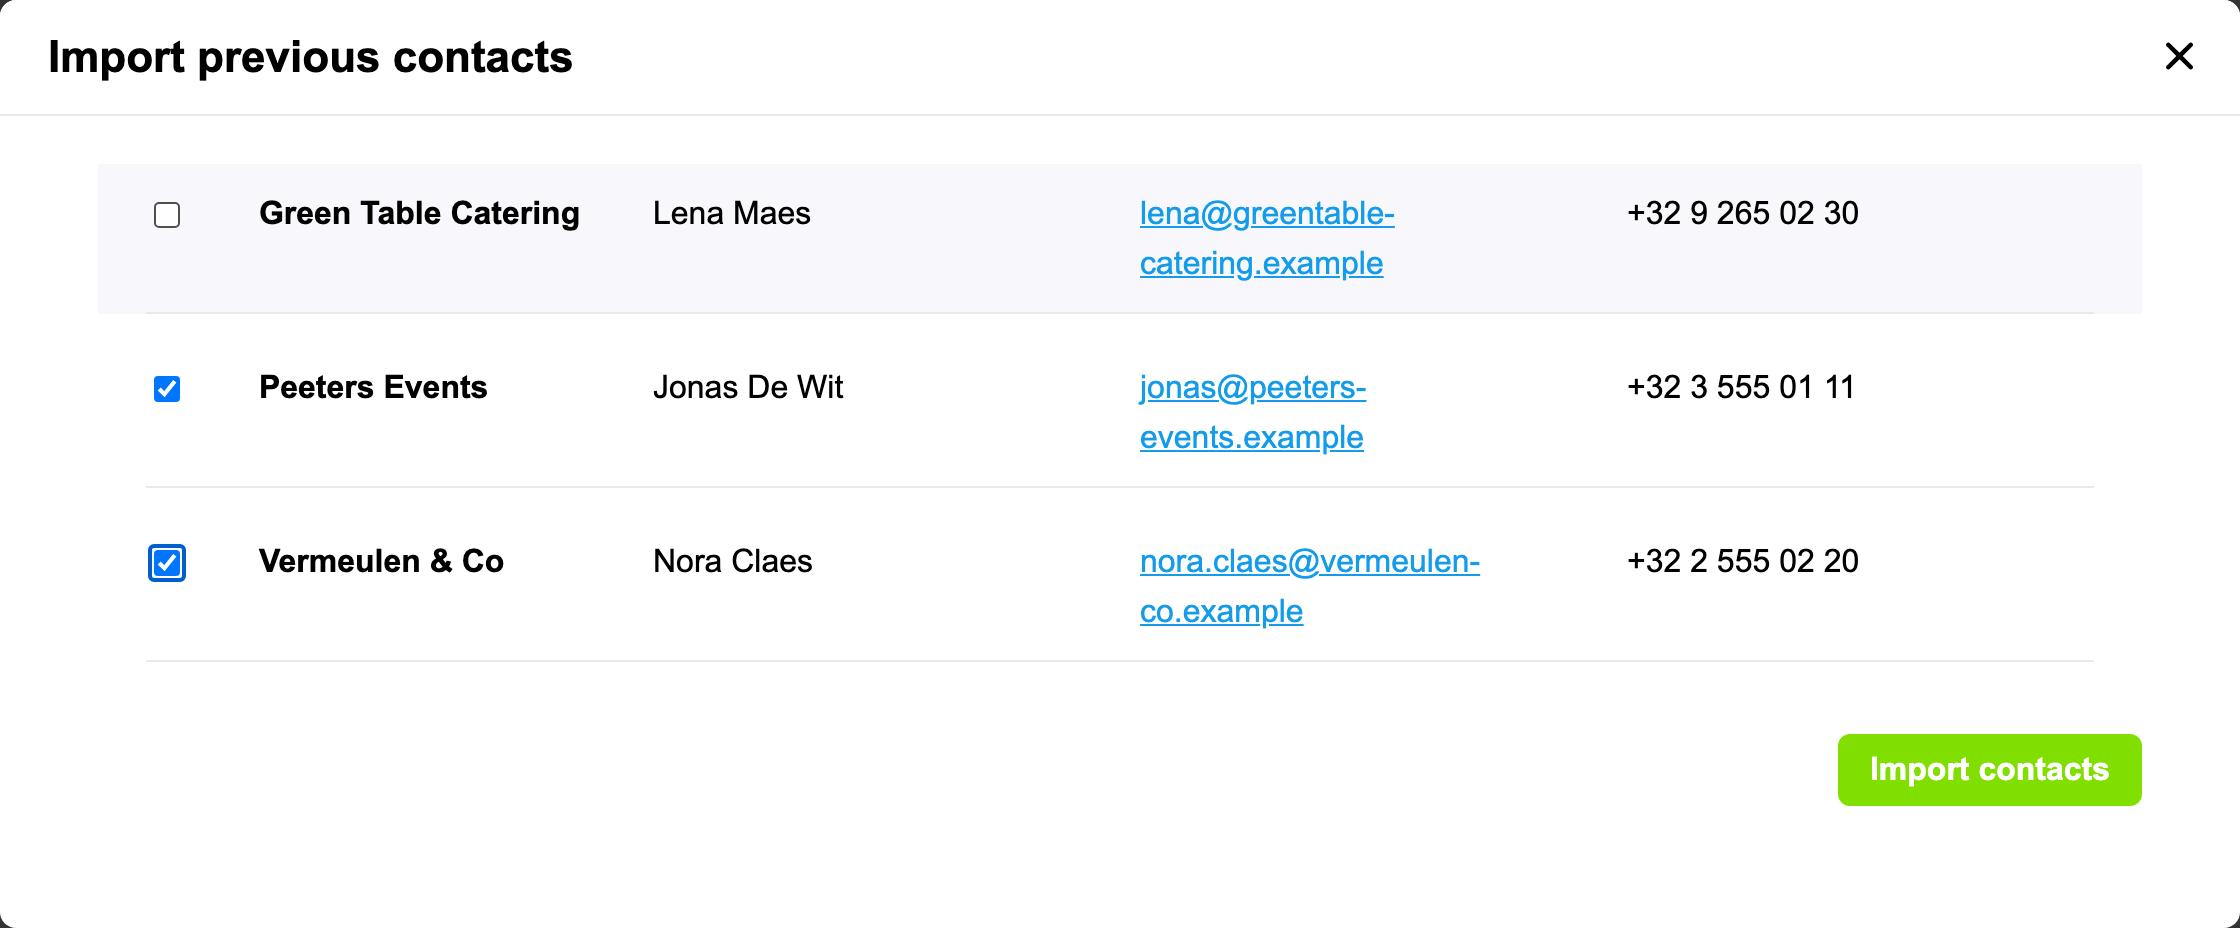
The window lists the people from your other events who accepted their invitation there and are not on this event yet. It covers every event whose contacts you may read, also events of someone else where you are a contact. Tick the people you want and click Import contacts. Under Rights for imported contacts you set the access they get on this event, one setting for the whole group, for Moodboards, Checklists, Callsheets, Contacts and Budgets. Click Import contacts again to finish.
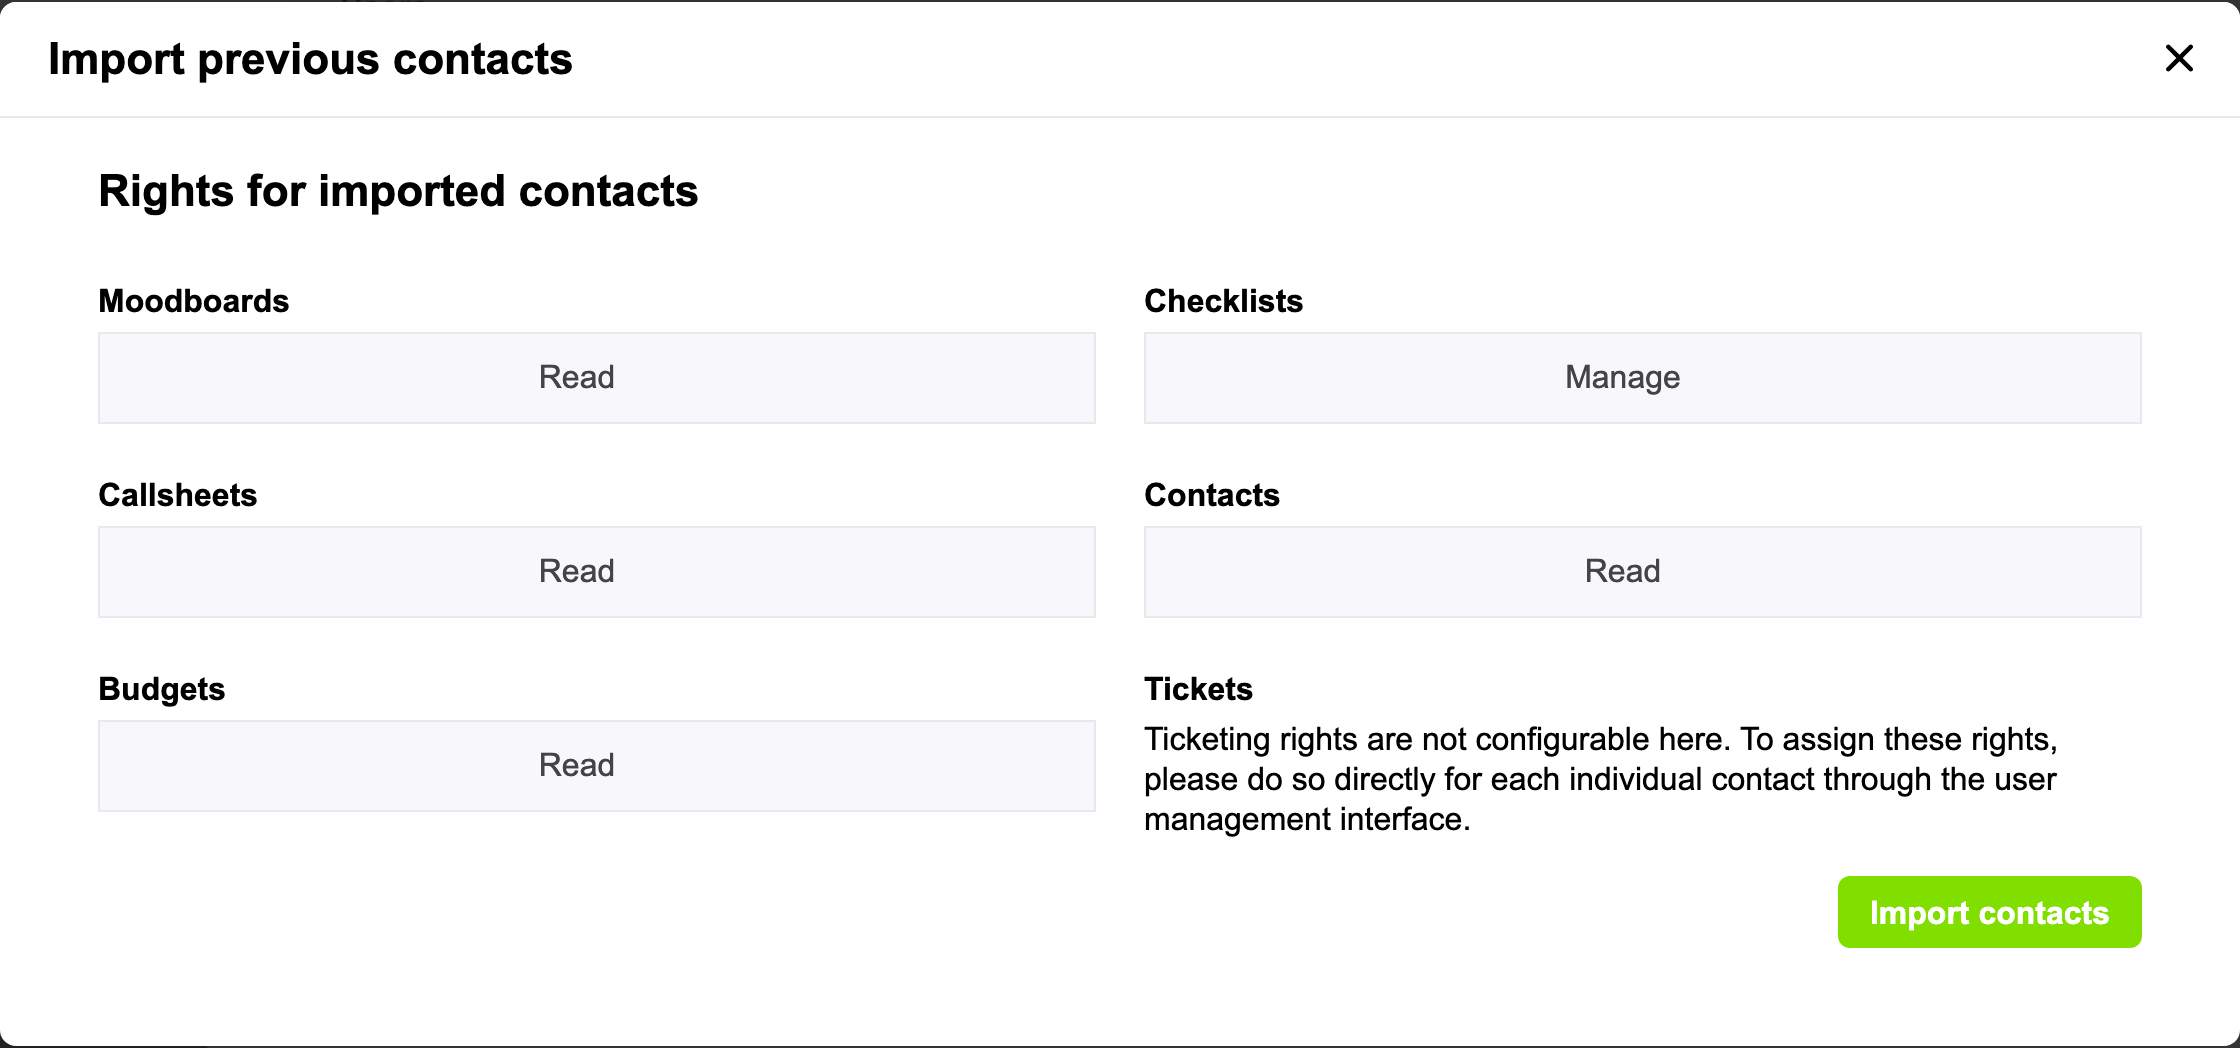
Imported contacts are added silently: they already have an account, so no invitation is sent and your event simply appears in their event list. A few things to know:
- Only users who accepted an invitation can be imported. Contacts without access and invitations that are still pending are not in the list: add those again by hand.
- The access to Tickets cannot be set here, because it needs 2FA per person (section 4). Open the imported contacts one by one to set it.
- The access to Suppliers, Briefings, Plan / Seating and Marketing is not in the window either: imported contacts keep the access they had on the event you import them from. Check it per contact after the import.
- Only own items is off for every imported contact. Tick it per contact afterwards where you need it.
Tip: when you create a new event as a copy of an earlier one, the copy wizard has a step to bring the contacts along, access included. Read how to set up an event.
8. What your contacts see
A contact with access logs in on eventplanner.net and opens the event software. Your event is in the list of events at the top of every tool, together with their own events and the other events they were invited to. In the menu of the event they see every tool, and the tools you gave them access to open normally.
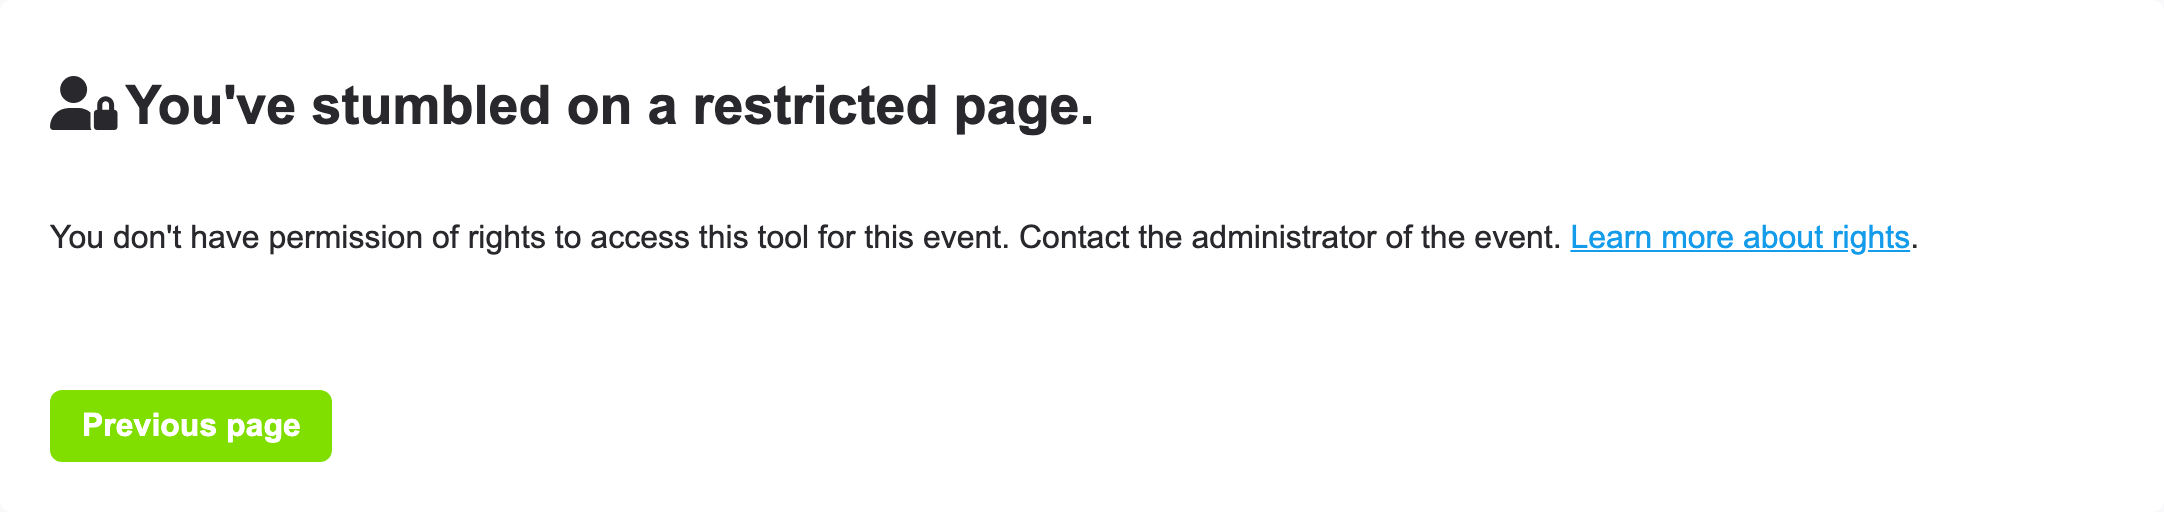
A tool they have no access to shows You've stumbled on a restricted page. with the explanation You don't have permission of rights to access this tool for this event. Contact the administrator of the event. That is you: give them the access in Contacts and the tool opens.
A few things that are good to know for your team:
- An event that is shared with them does not count for the limits of their own free version: they can work on your event without upgrading. Only Suppliers and Plan / Seating need their own .PRO membership (section 1).
- The event software also works in the eventplanner.net app on iOS and Android, with the same access. Your team can check the callsheet or tick off a task on their phone.
- A published briefing is visible to every contact of the event, whatever their access to Briefings: they see the blocks addressed to them. Read how to use Briefings.
- Their account stays their own: you cannot see their password, change their e-mail address or switch on 2FA for them.
9. Privacy
The contacts you add are personal data: names, e-mail addresses and phone numbers of the people at your client, your suppliers and your team. You process them as the organiser of the event, and eventplanner.net processes them for you under our processing agreement. In practice:
- add what you need for the event and leave the rest out,
- remove contacts you no longer work with, and take the access away from people who leave the team,
- give access to Contacts only to the people who really need the whole list,
- tell the people you add that they are on the contact list of your event, in particular contacts without access, who do not get an e-mail from us.
Frequently asked questions
My colleague did not receive the invitation. What now? Ask them to check the spam folder, and check the e-mail address in the contact. From 30 minutes after the last invitation, Resend invite in the contact sends the e-mail again.
They accepted, but do not see my event. They probably logged in with another e-mail address than the one you invited. The invitation only works for the account with that exact address. Ask them to log in with the invited address, or change the address in the contact and send the invitation again. Also check the list of events at the top of the tool: your event may simply not be the one that is open.
Why can't I set the access to Tickets? The contact first has to accept the invitation and switch on 2-factor authentication on their own account. Then the dropdown appears (section 4).
Why is there no Delete button? The contact still has tasks, callsheet lines or watched tasks on this event. Reassign or remove those first. The owner of the event can never be deleted.
Does a contact need an eventplanner.net account? Only to log in and work on your event. A contact without access needs nothing: you keep them for reference, assign them callsheet lines and send them briefings by link.
Does a contact need .PRO? Not for Moodboards, Checklists, Callsheets, Budgets, Briefings, Tickets, Contacts and Marketing: Marketing needs .PRO on the account of the owner of the event, not on theirs. Suppliers and Plan / Seating are .PRO tools and need a membership per person.
Can I give someone access to one event only? Yes. Access is set per event. A person you add to one event sees nothing of your other events until you add them there too, by hand or with Import previous contacts.
Can I hand my event over to someone else? The owner of an event is fixed. Give a colleague Manage access to every tool and they can do everything you can do, except change your own row. For a new event, let the colleague create it so it is theirs, and ask them to add you as a contact.
How many contacts can an event have? Up to 50 in the free version of the event software and up to 400 with .PRO. Full? Add contact then opens a window that invites you to upgrade. Remove contacts you no longer need, or upgrade.
Are my contacts copied when I copy an event? Yes, if you keep them ticked in the copy wizard. They are added to the new event silently, without an e-mail. Read how to set up an event.
Can a contact see the other contacts? Only with access to Contacts. Without it, they see the names of the team where they assign tasks or callsheet lines, but not the list with e-mail addresses and phone numbers.
Read also
- Master eventplanner.net: Complete guide and training to our event software
- How to set up an event in the eventplanner.net event software
- How to use Moodboards?
- How to use Checklists?
- How to use Callsheets?
- How to use Budgets?
- How to use Supplier Management?
- How to use Briefings?
- How to use Tickets?
- How to use Floor plans?
- eventplanner.net certification
