


Event software training
How to use Briefings?
Everyone who works on your event needs to know something different. The caterer wants to know when the kitchen opens, the venue needs your set-up requirements, your own team needs the guest list. Briefings lets you write all of that once, in one briefing per event, and shows every person only the part that is meant for them. It is part of the event software of eventplanner.net.
A briefing is made of blocks. A block is one subject with a title and a text, written where you read it, and shared with the people it is for: everyone, a supplier category, a specific supplier or a specific user. On top of your blocks sits the Schedule: every recipient sees the lines of your callsheet that are assigned to them, so they know when and where they are expected.
Want to see what Briefings can do for you before you start? Have a look at the overview page first.
Where to find it: log in, choose event software in the main menu and open Briefings in the menu of your event.
Good to know: Briefings is in beta. The tool works, but it is still being developed and not every feature is final. It is free to use during the beta period. Whether it stays free for everyone afterwards or becomes part of .PRO has not been decided yet.
1. Start with an event
A briefing always belongs to an event, so if you do not have one yet, you are asked to create it. Click Add your first event, fill in a name, a date and the type of event, and save.
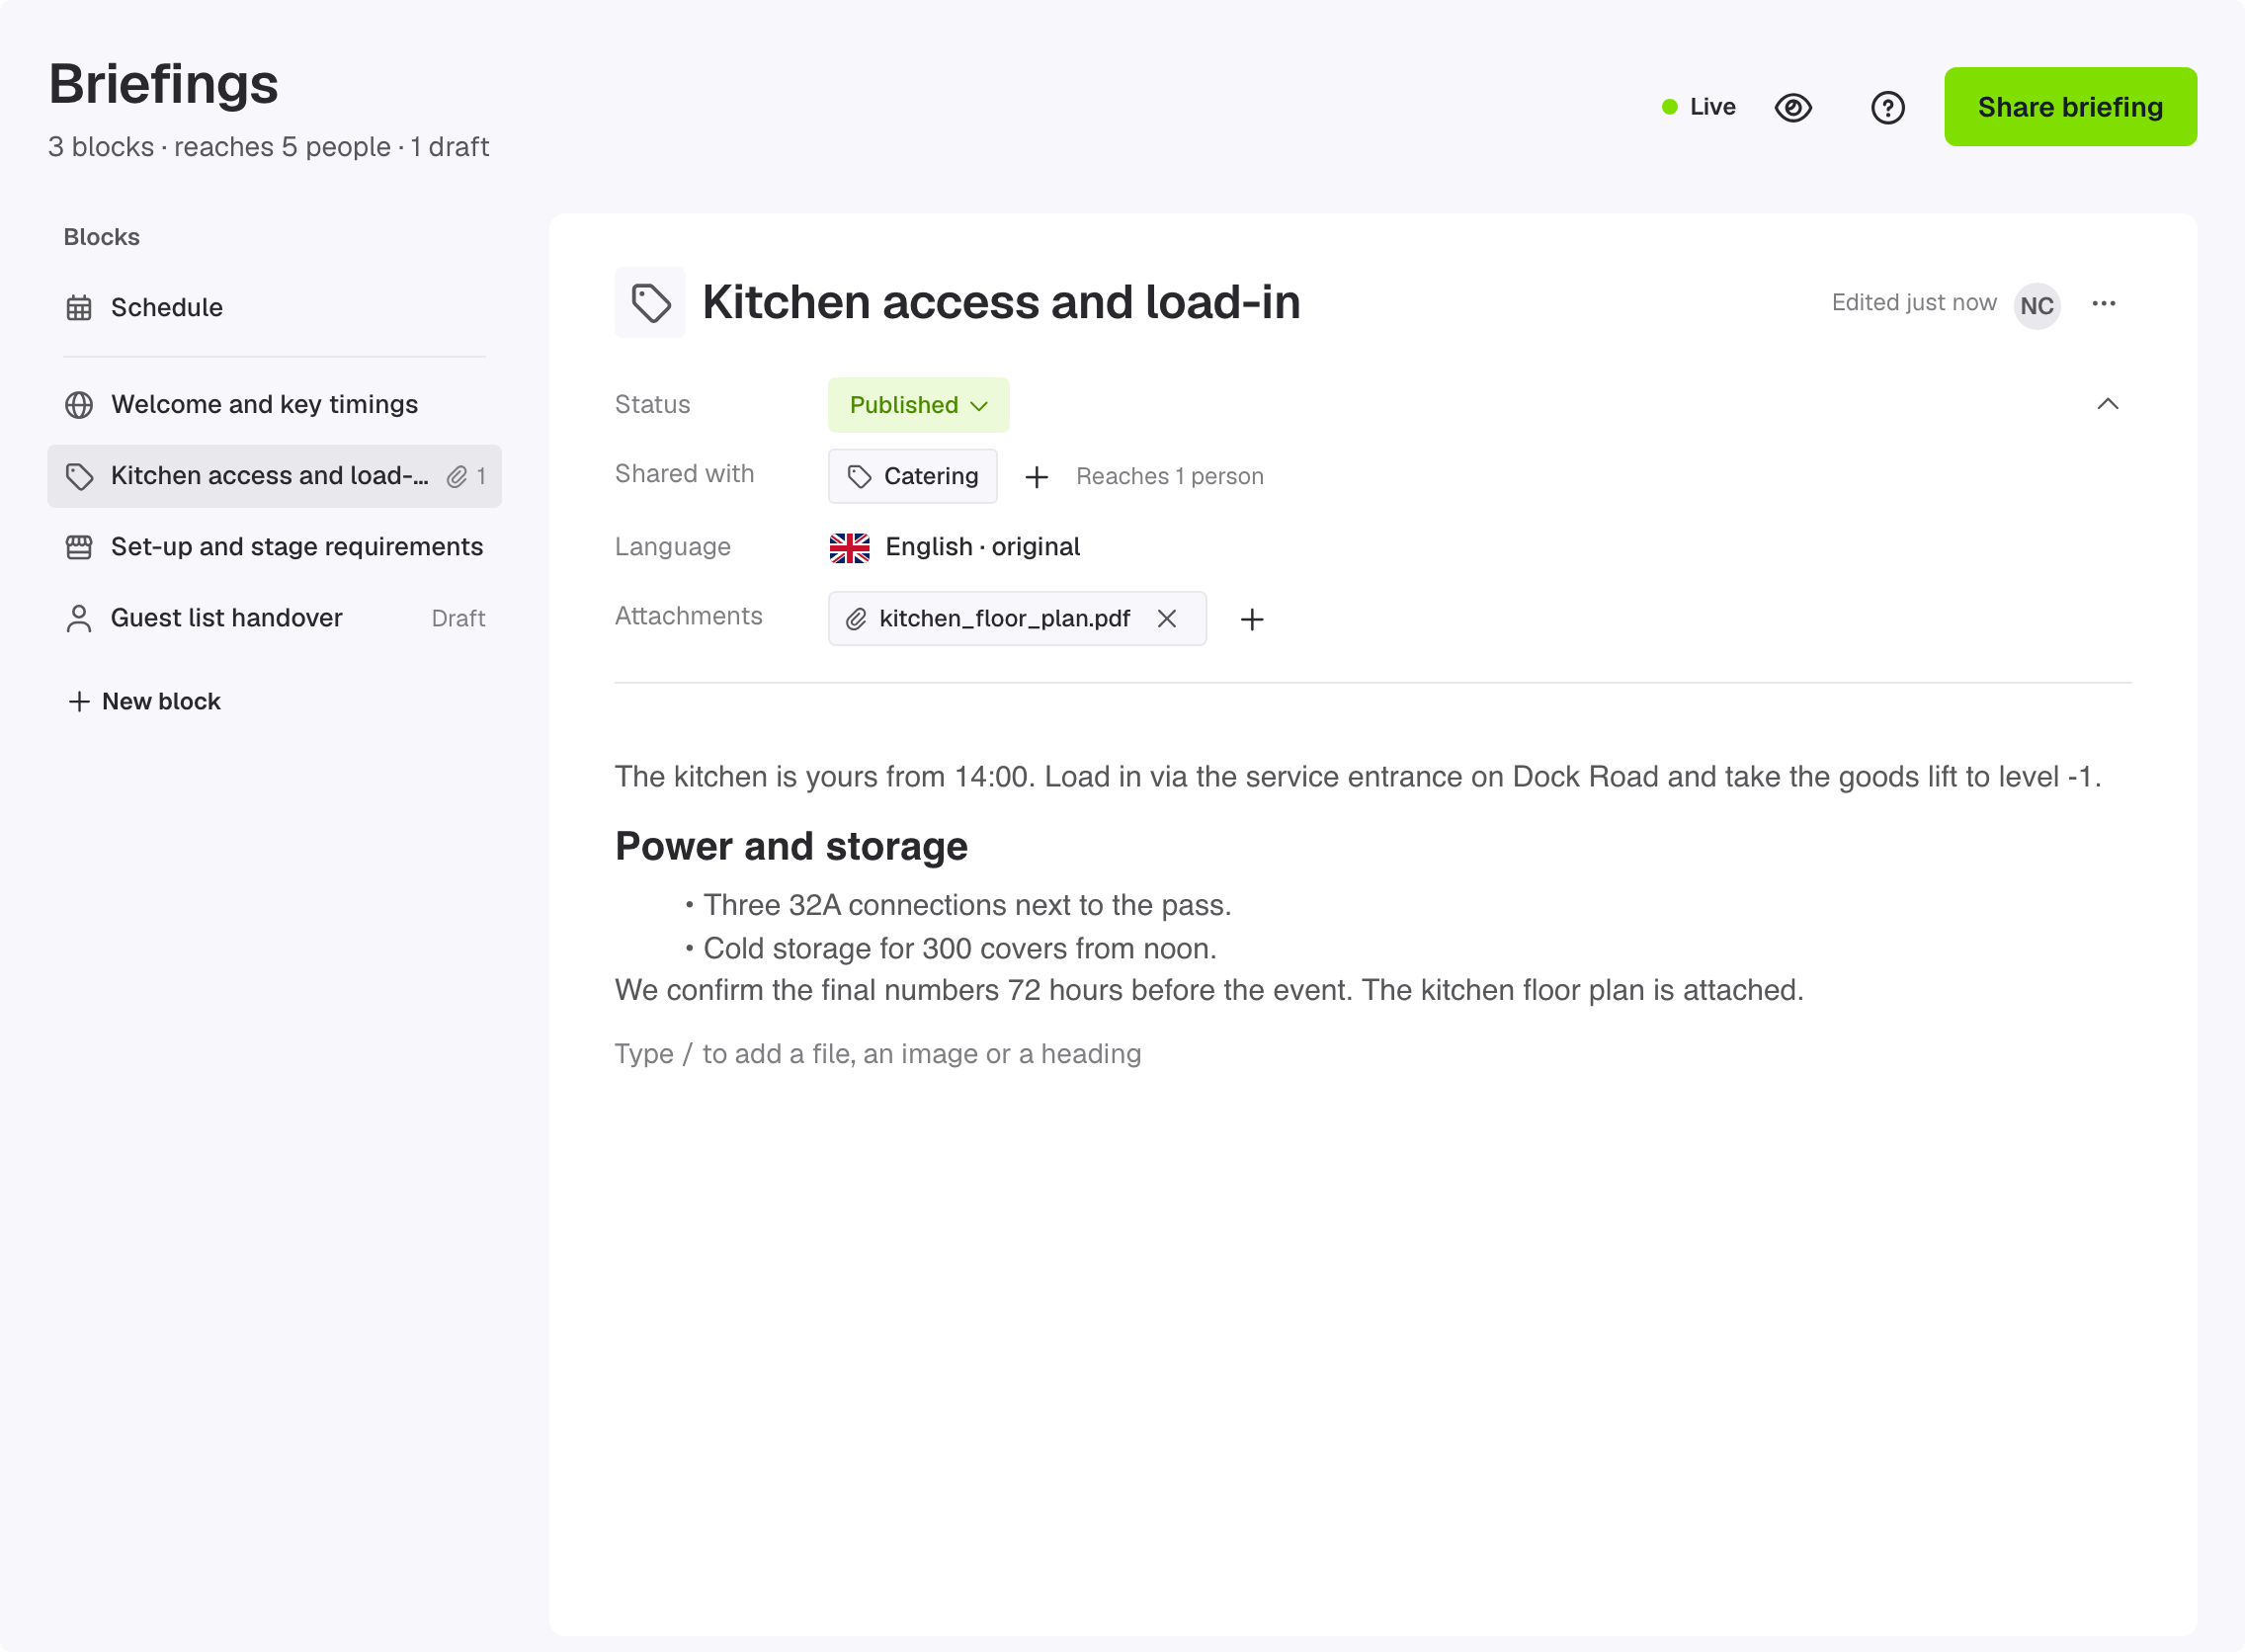
Your briefing is created straight away, still empty. Click New block under the list to write the first block, and add as many blocks as you need. On the left you see the list of Blocks, with the Schedule pinned on top; the block you open shows on the right.
2. Who can receive a briefing?
A block is shared with people from two other tools of your event. Set them up first, then your briefing has someone to talk to.
- Users are the contacts of your event in Team & access: your team, your client, a freelancer, or the contact person of a supplier.
- Suppliers are the companies of your event in the Suppliers tool, each with a Supplier type such as catering or venue. A supplier receives a briefing through its contact persons: open the supplier, and under Contacts click Add contact. A contact you add in Team & access with the company name of a supplier is linked to that supplier automatically.
- Categories are the supplier types. A block for the category catering reaches the contact persons of every caterer of your event. That makes categories handy when you do not know yet which company you will work with.
Good to know: the Suppliers tool is part of .PRO. Without it, share your blocks with everyone or with specific users.
3. Add a block
Click New block under the list of blocks. A blank block opens straight away, ready for its title. Choose who it is for under Details (section 4). A new briefing starts empty: Write your first block shows until you add one.
On a phone the list of blocks is a screen of its own: tap a block to open it, and Blocks at the top of the block takes you back.
| Who it is for | Who sees the block |
|---|---|
| Everyone | Every contact of your event. |
| Categories | The contact persons of every supplier of that type. A type without a supplier yet shows "no supplier yet": the block reaches nobody of that type until you add a supplier. |
| Suppliers | The contact persons of the suppliers you tick. |
| Users | The contacts you tick. |
A new block starts as a draft: only you and the other people who manage the briefing see it, even when the briefing is published. Write it first, then click Publish block at the top right of the block to share it with the people it is for. Two things decide what someone gets: the briefing is published (the Published switch in Share briefing, the top of the page then says Live) and the block is published. The Status pill at the top of Details shows which it is; click it to switch between Draft and Published.
4. Write a block
Everything on a block is changed where you read it, and saved as you go.
- Title: click it and type. Enter or clicking elsewhere saves it. A block needs a title.
- Text: click under the line and write. It saves when you click elsewhere. Type / at the start of a line or after a space for a menu: File, Image, Divider, headings, lists, a checklist, inline code and a quote. A Markdown shortcut works too:
#,-,1.or>and a space.
Under the title, Details shows what the block is about. Click its header to close or open it; it stays the way you leave it.
| Detail | What it does |
|---|---|
| Shared with | Who gets the block, as chips. Click + to choose: tick or untick everyone, a category, a supplier or a user, and it saves at once. Reaches ... people counts them. When nobody gets the block yet, a warning says why: Choose who this block is for when nobody is chosen, No supplier in ... yet when the category has no supplier, No supplier in ... has a contact yet when the category's suppliers have no contact person, No contact at ... yet when the supplier has no contact person. |
| Language | The language you wrote the block in, marked original. The other languages are translated automatically. To write a translation yourself, pick that language here: the block shows its translation (automatic), and what you change stays as you write it (your text). Translate automatically again hands it back to the automatic translation. Recipients read the block in the language of the eventplanner.net site they open it on. |
| Attachments | The files of the block. Click to add files or drop them anywhere in the canvas under them picks files, several at once, each added straight away; once there are files it is a + after them. Files dragged from your computer can also be dropped anywhere on the block you are writing. File and Image in the / menu do the same. The cross on a file removes it. |

Files on a block
Attaching files needs .PRO; without it, the add button in Details, a file dropped on the block, and File and Image show you what .PRO adds. A file can be up to 25 MB: PDF, Word, Excel and PowerPoint documents, text files, and PNG or JPEG images. Every file is checked before it is shown to your recipients: until then it shows an hourglass, and a file that does not pass the check is never shared.
A file belongs to its block: only the people the block is for can download it. Only the person who uploads files needs .PRO, the recipients download them without.
Give a block an icon
Each block shows an icon in the list of blocks: by default the one of who it is for (a globe for everyone, a tag for a category, a store for a supplier, a person for one user). Click the icon before the block's title to pick one of your own, for example a truck for transport or a microphone for the show. Automatic brings back the default. Your recipients see the same icon in their briefing.
Put the blocks in order
Drag a block up or down in the list of blocks. Your recipients read the blocks in that order, under their schedule, so put the most important ones first.
Copy, duplicate or delete a block
Every block has a menu (...): at the top of the open block, and next to the block in the list when you point at it (which also has Publish block or Move to drafts). Copy block link copies the block's address for the other people who manage the briefing. Duplicate adds a copy right under the block, as a draft, with its text, translations and audience but not its files.
Delete block asks first, naming the block and its files. The block disappears for everyone; Undo in the message that follows puts it back where it was, without its files.
5. The Schedule
The Schedule is pinned on top of your blocks. It is the callsheet of your event from the Callsheets tool, so you never copy timings into a block: write them once in the callsheet and put the right people in the Who? column of every line. Read more in how to use Callsheets. Open callsheet takes you there.
Every recipient sees the callsheet lines that name them, first thing in their briefing. A contact who has access to Callsheets without Only own items sees the whole callsheet. A note at the top of the Schedule says so; when you may change your contacts' access, it has a Team & access link to do it.
6. See what one person gets
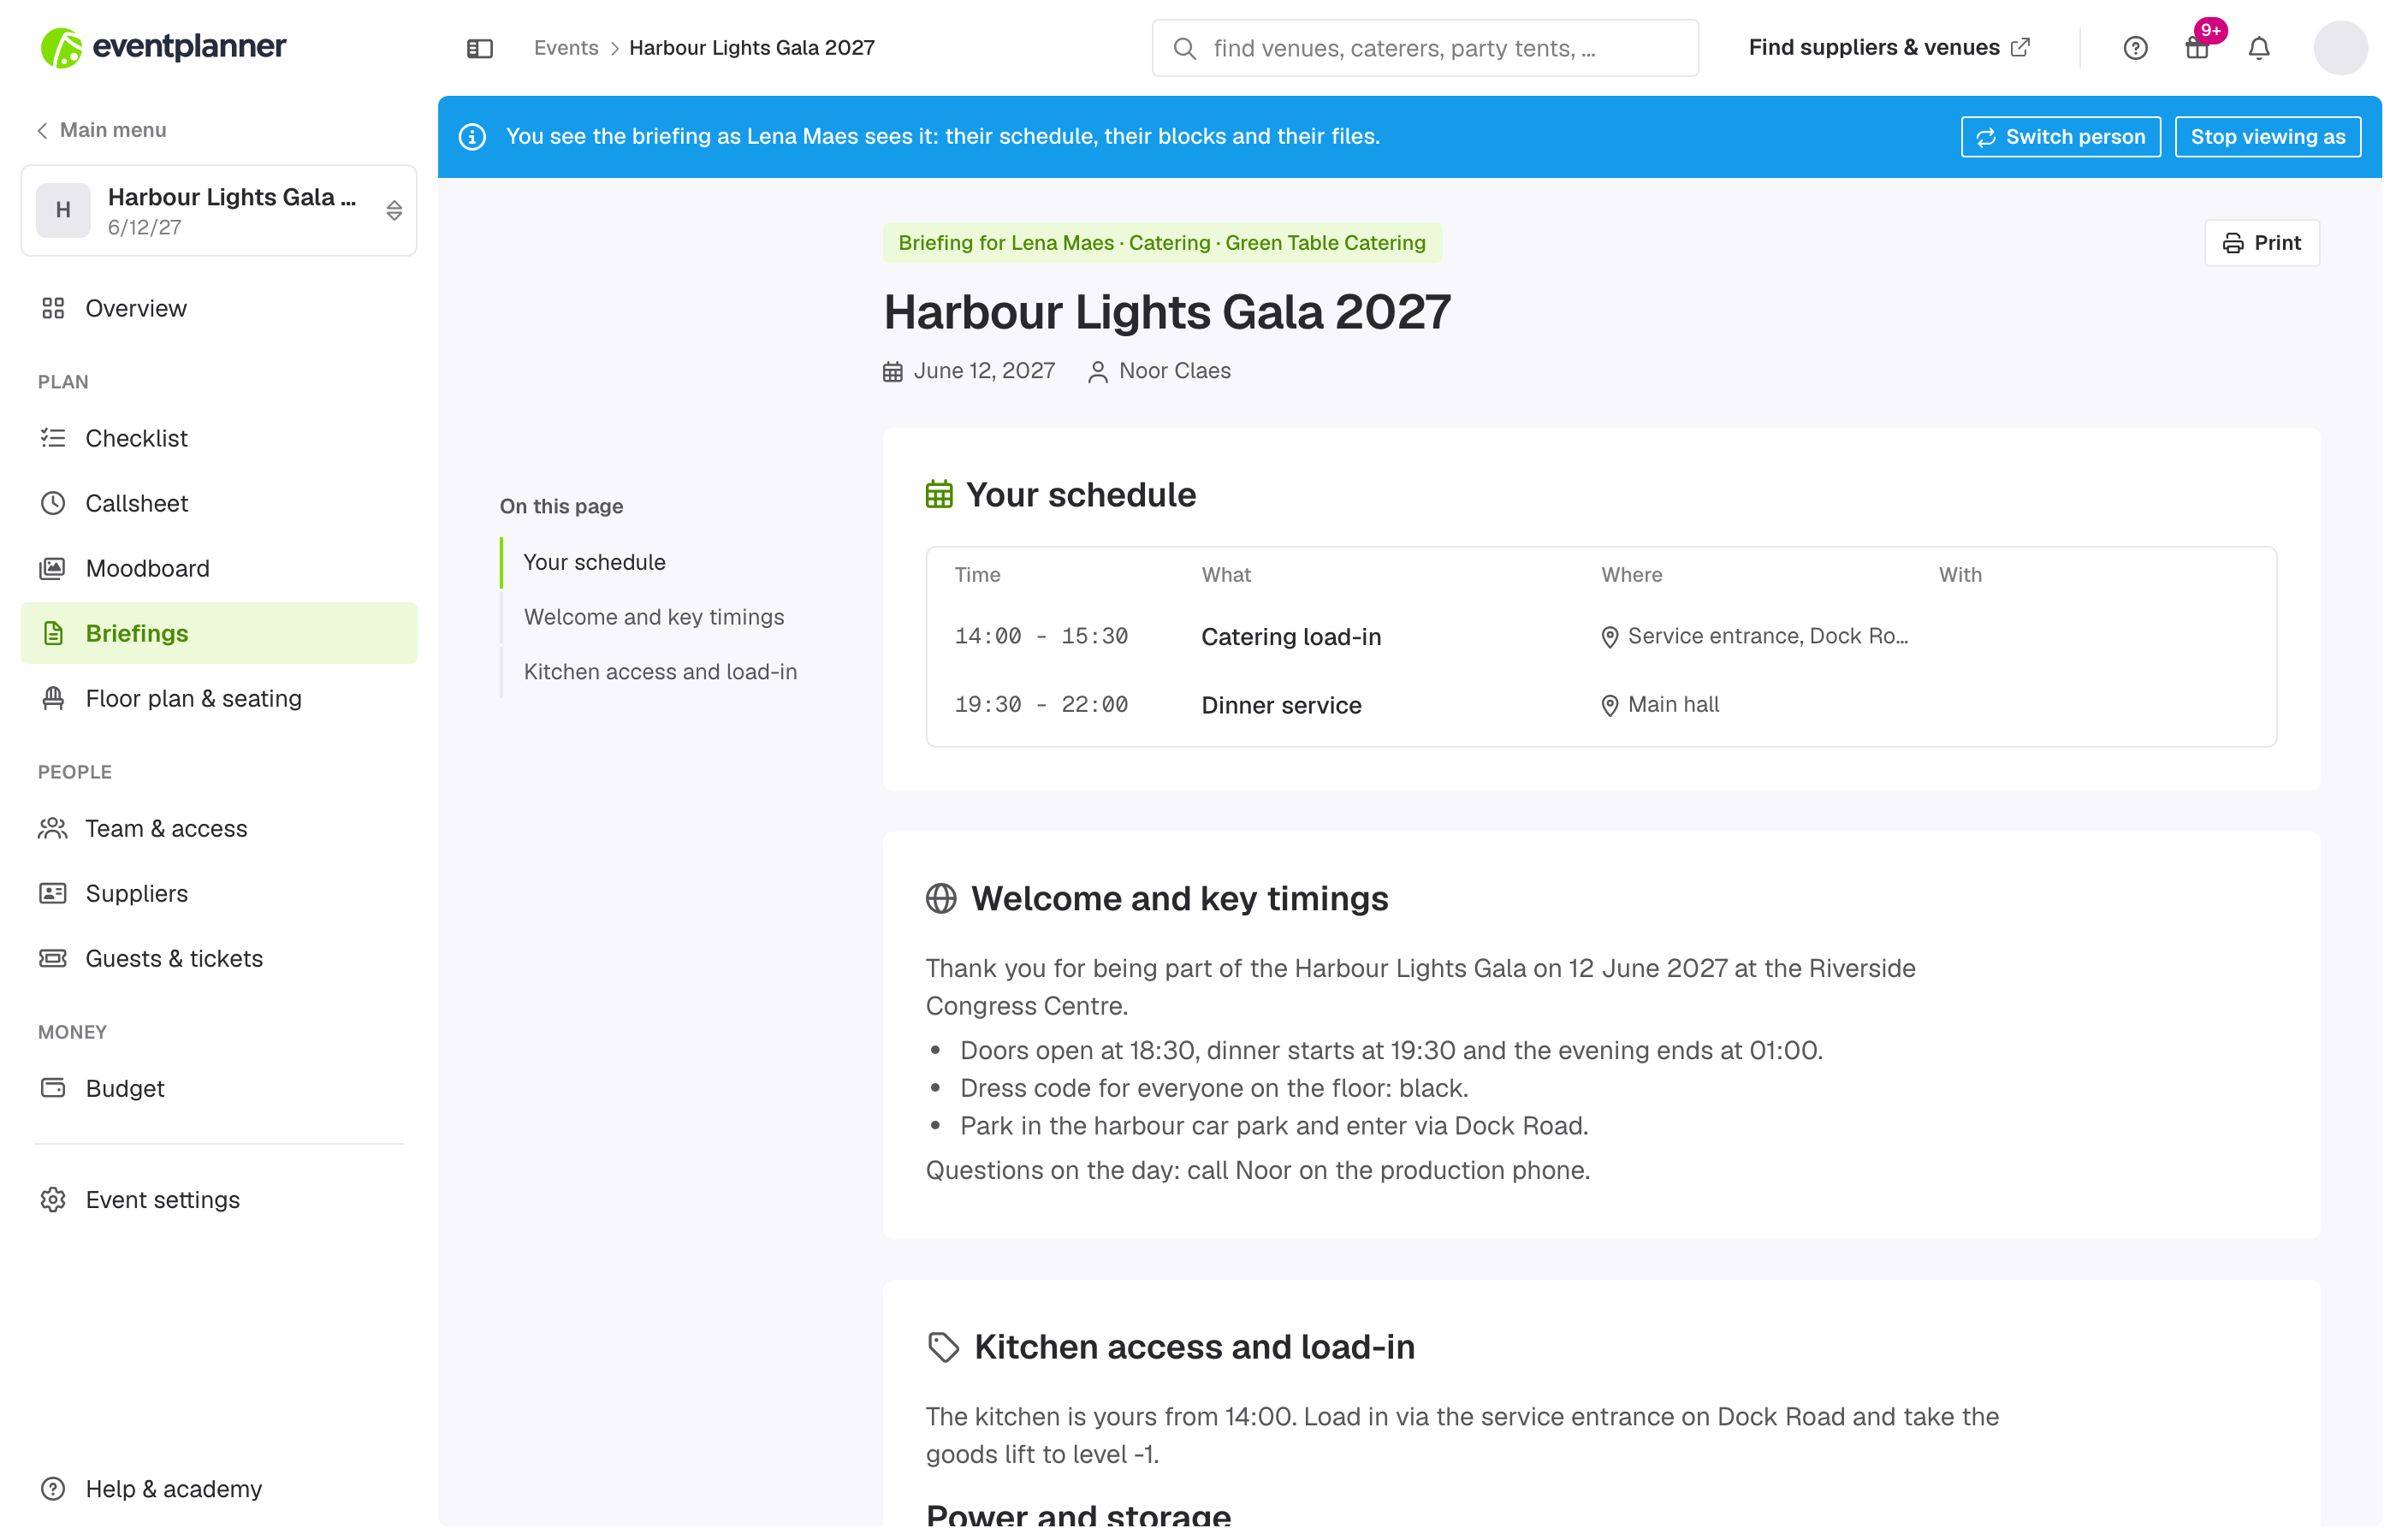
Click the eye at the top of the page (View as), search or pick a person. You see their briefing exactly as they get it, read only: their schedule lines, their blocks and their files, under a blue bar that names them. Switch person in that bar opens the same list, so you can go from one person to the next. Stop viewing as brings you back to the editor. The list holds everyone your published blocks reach, so it is also a quick check that a supplier has a contact person.
7. Publish and share a briefing
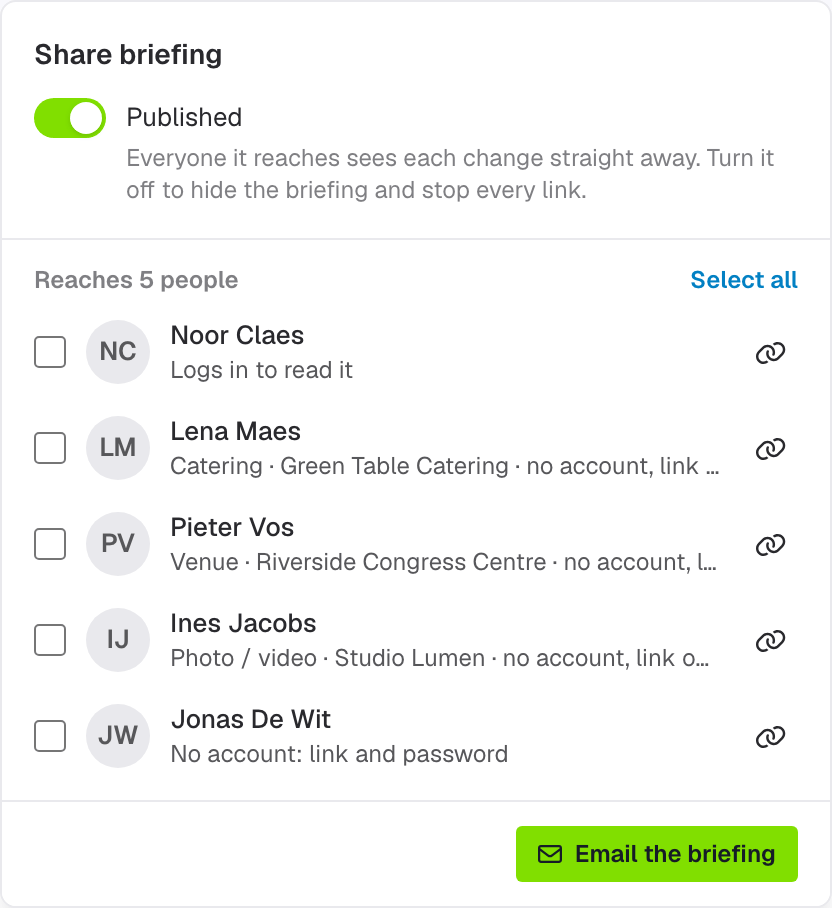
Click Share briefing at the top of the page. Everything about sharing is in this one panel.
Publish
Until you switch Published on, the briefing is yours alone: users with access to Briefings see nothing and share links do not work. Once it is published, everything you change is visible to your recipients immediately; there are no versions. Switch Published off to take the whole briefing offline: users no longer see it and every share link stops working. The badge next to Share says Live or Draft.
Users who log in
Every contact of your event who logs in opens the event in the event software and finds the briefing under Briefings, whatever their access level to Briefings (section 8). They get one document: their schedule first, then the blocks shared with them, with a list of contents.
Tip: the eventplanner.net app opens the same page from its tools tab, so your team has the briefing on their phone.
Share links
The Share panel lists everyone your published blocks reach, with who they are on the event (their supplier's category and name), or Logs in to read it or No account: link and password, under their name. Tick the people to mail and the button counts them (Email 2 people). Click the link icon next to a person to copy their personal link and password, and pass both on to them, for example in a chat message or by phone.
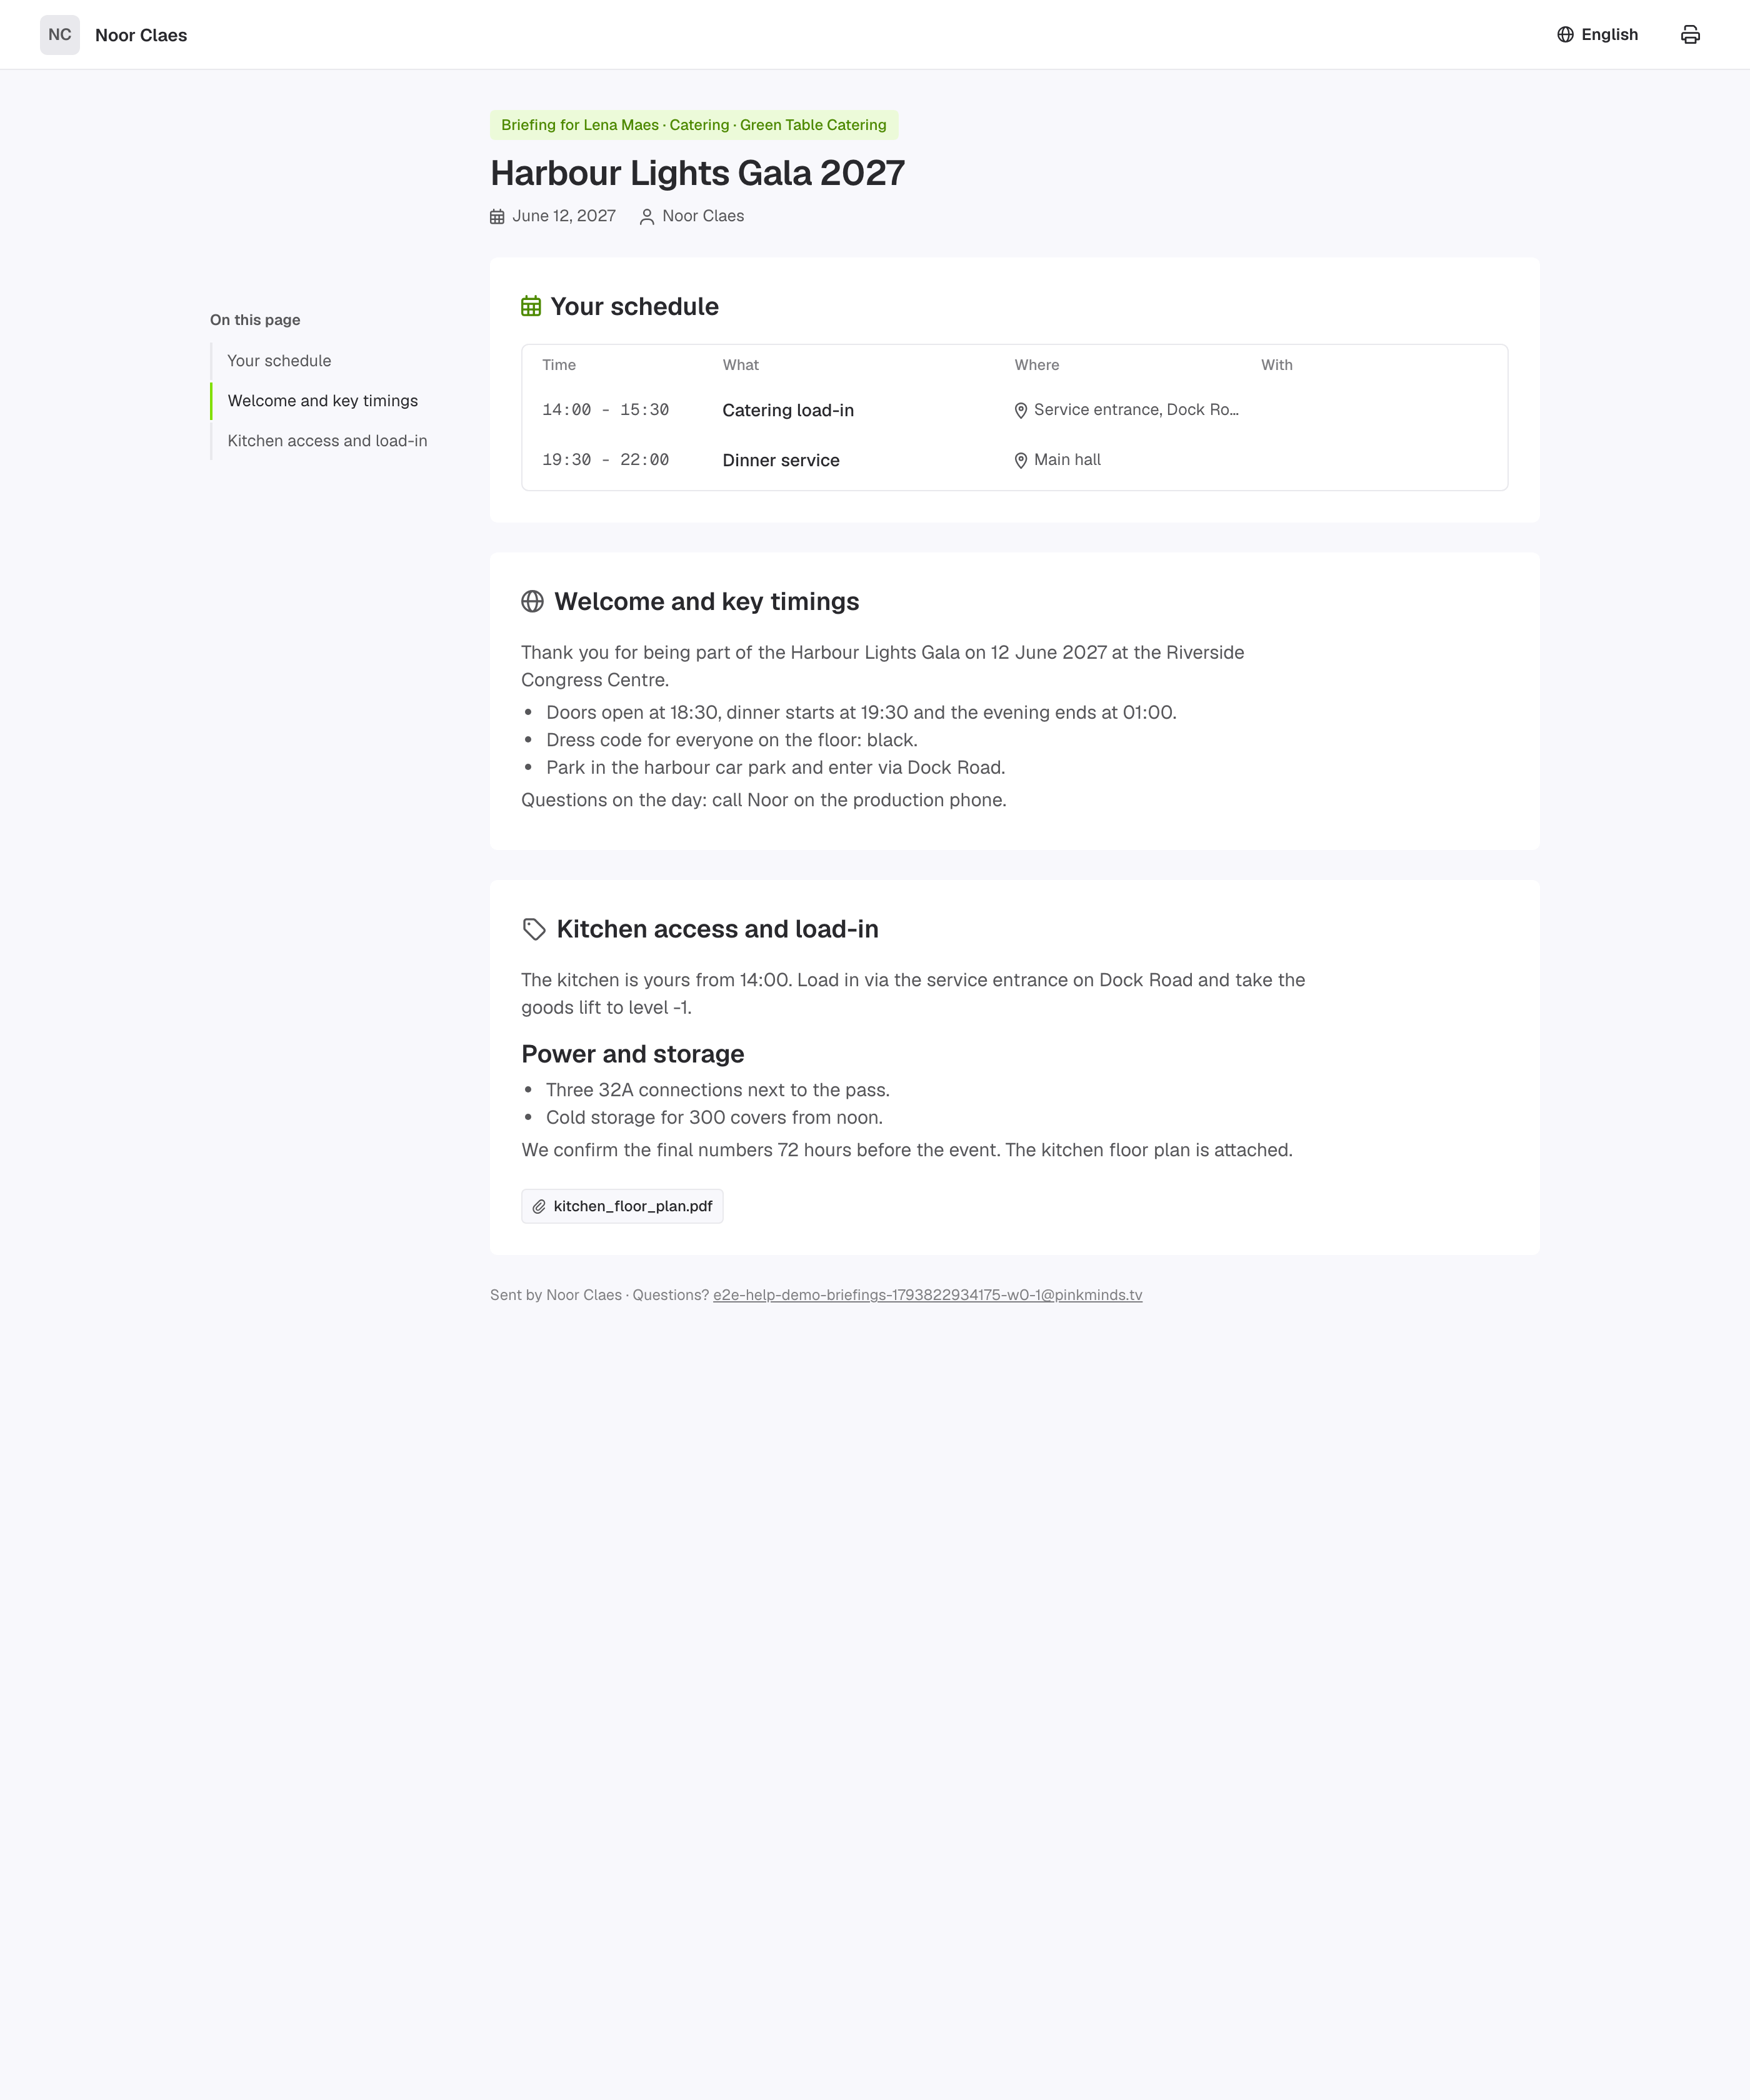
A recipient does not need an eventplanner.net account. The link opens a page with your name, the event and who the briefing is for, and asks for the password; under it, whom to ask when they lost it. After clicking View briefing they see their briefing: their own schedule lines, their blocks with the files to download, and at the top a menu to read it in another language and a print button.

Send email
Tick the people you want to mail in the Share panel and click Email the briefing. Everyone gets an e-mail with the subject Briefing for event followed by the name of your event. A contact who has an eventplanner.net account gets a link to log in and open the briefing in the event software. A contact without an account gets their personal link and the password. The e-mail is sent in your name as the organiser, not in ours: it names you as the organiser, with your e-mail address for questions, and your logo and contact e-mail appear at the bottom when you have set them up for your events.
An address that bounced earlier, or that is blocked, cannot be ticked: the panel says why under the name, so you can correct the address in Team & access and send again.
Tip: send the e-mail again after an important change. The briefing itself is always up to date, but your recipients do not get a notification when you edit a block.
Keep it private
- A recipient sees only the blocks shared with them, not who else a block is shared with.
- A share link plus its password gives access to the briefing of one person. Ask your recipients not to forward them. A link cannot be disabled on its own: to cut off access, switch Published off, which disables every link at once.
- Your recipients' names and e-mail addresses are contacts of your event. Our processing agreement describes how eventplanner.net handles that data for you.
8. Work on it together
Briefings is useful when you plan alone, and even more when you plan with a team. Add the people you work with in Team & access in the menu of your event. Under Set contact access, choose what each of them may do in Briefings:
| Access | What they can do |
|---|---|
| No access | They see the published briefing with the blocks shared with them, like every contact, but they cannot download its files. This is the default for a new contact. |
| Read | They can also download the files of the blocks shared with them. |
| Manage | They can add, write, delete and reorder blocks, view the briefing as someone else, publish and share it. |
A contact gets an invitation by e-mail and logs in with their own eventplanner.net account. Read more in how to manage users in the event software.
Tip: everyone with Manage access can see every block, also drafts and the blocks shared with someone else. They also see the whole callsheet on the Schedule, even when their access to Callsheets is No access or set to Only own items. Give it only to the people who build the briefing with you.
Frequently asked questions
Can I use Briefings for free? Yes, during the beta period. Attaching files to a block needs .PRO, and so does the Suppliers tool you need to share blocks with suppliers and categories. Everything else works in the free event software.
Why does a user not see the briefing? Check four things: the briefing is published (section 7), the block is published and not a draft (section 3), the user logs in with the account your invitation was sent to, and the block is shared with them, their supplier, the category of their supplier or everyone. View as (section 6) shows what they get.
Why can't a user download a file? Downloading the files of a block needs Read or Manage access to Briefings. Set it under Set contact access in Team & access (section 8).
Why is a category listed under "No supplier yet"? Your event has no supplier of that type yet. Add one in the Suppliers tool and give that supplier a contact person. Only then does a block for that category reach someone.
Why does a block show a warning next to Shared with? Nobody gets the block yet: it is shared with nobody, the supplier or user it was for was deleted, or its category has no supplier with a contact person. Click + next to Shared with and choose who it is for, or delete the block.
Can a recipient see other blocks? No. Everyone sees only the published blocks shared with them, their supplier, the category of their supplier or everyone. The same goes for the files: a file can only be downloaded by the people its block is for.
Can I see who has opened the briefing? No. Briefings does not keep track of who opened it. Ask your recipients to confirm, for example by replying to the e-mail.
Can I change or disable one share link? No. A link and its password belong to one contact and stay the same for your event. To cut off access, unpublish the briefing: every link stops working until you publish again.
Is my briefing copied when I copy an event? No. When you create a new event from an earlier one, the suppliers, contacts, checklists, callsheet and budgets are copied, but the briefing is not. Build it again in the new event.
Why can't I attach files? Attaching files is part of .PRO. Only the person who uploads the files needs it: your recipients download them without.
Read also
- Master eventplanner.net: Complete guide and training to our event software
- How to set up an event in the eventplanner.net event software
- How to use Moodboards?
- How to use Checklists?
- How to use Callsheets?
- How to use Budgets?
- How to use Supplier Management?
- How to use Tickets?
- How to use Floor plans?
- How to manage users in the eventplanner.net event software?
- eventplanner.net certification
